libprotobuf-mutator-training 目录
基本信息 repo: https://github.com/google/libprotobuf-mutator
依赖安装 1 2 3 sudo apt-get updatesudo apt-get install protobuf-compiler libprotobuf-dev binutils cmake \
编译流程 clone仓库
1 2 3 4 git clone https://github.com/google/libprotobuf-mutator.gitmkdir buildcd build
下面是对于cmake指令的解释,假设这里需要使用本机的clang-14和clang++-14,那么指令如下
下方的-GNinja指定了构建系统的生成器,因为其效果比makefile好用,然后-DCMAKE_C_COMPILER和-DCMAKE_CXX_COMPILER分别指定了CC和CXX,最后的-DCMAKE_BUILD_TYPE是构建类型
1 cmake .. -GNinja -DCMAKE_C_COMPILER=clang-14 -DCMAKE_CXX_COMPILER=clang++-14 -DCMAKE_BUILD_TYPE=Debug
同样的,也可以提前使用环境变量的形式
1 2 3 export CC=clang-14export CXX=clang++-14
对于这个选项也可以开启LIB_PROTO_MUTATOR_DOWNLOAD_PROTOBUF=ON,作用是会下载合适的protobuf的二进制文件,这样后续编译proto文件的时候,就可以使用这个随编译时下载的protoc了
使用任意选项时前面需要加上-D,对应上面的来说就是-DLIB_PROTO_MUTATOR_DOWNLOAD_PROTOBUF=ON
另外一种方式是直接apt 安装sudo apt install -y protobuf-compiler
接着执行如下指令,可以开始编译。指令的区别在于ninja直接编译不进行测试检查,ninja check会有一个编译后的检查,时间会比直接执行ninja长一点
如果想要安装到/usr/local/include/下,执行sudo ninja install ,最后会出现在/usr/local/include/libprotobuf-mutator
使用方法 全部的代码见github:xxxxx
等待施工
protobuf的简单使用 如果上方编译的参数开启了-DLIB_PROTO_MUTATOR_DOWNLOAD_PROTOBUF=ON ,那么在/yourpath/libprotobuf-mutator/build/external.protobuf/bin/目录下存在
1 2 3 4 5 6 ➜ bin git:(master) ls -al
这里的protoc使用来编译.proto文件的,例如将test.proto文件编译之后,会得到test.pb.cc和test.pb.h,其中涉及到protobuf实现的一些细节
接着来写一个简单的protobuf实例
先完成test.proto部分,我这里采用proto3的语法
buffers 1 2 3 4 5 6 syntax = "proto3";
接着是test.cc的部分
1 2 3 4 5 6 7 8 9 10 11 12 13 14 15 16 #include "test.pb.h" #include <iostream> int main () a () << std::endl; b () << std::endl; set_a (42 );set_b ("hello" );a () << std::endl; b () << std::endl; return 0 ;
最后设置makefile,下方我指定了本地的clang++-14,然后设置了一些头文件和静态库的位置,其中debug部分可以帮助我输出一些目录是否正确。
1 2 3 4 5 6 7 8 9 10 11 12 13 14 15 16 17 18 19 20 21 22 23 24 25 26 27 28 29 30 31 32 33 34 35 36 37 38 39 40 41 42 CXX = clang++-14$(LPM_DIR) /build$(LPM_BUILD_DIR) /external.protobuf$(PROTOBUF_DIR) /lib/libprotobufd.a$(PROTOBUF_DIR) /bin/protoc$(wildcard $(PROTOBUF_DIR) /lib/libabsl*.a) $(wildcard $(PROTOBUF_DIR) /lib/libutf8*.a) $(PROTOBUF_DIR) /include $(PB_SRC_DIR) /test.pb.ccall: proto test proto: test.proto $(PB_SRC_DIR) $(PROTOC) $< --cpp_out=$(PB_SRC_DIR) test: test.cc $(PB_SRC) $(CXX) $(INC_FLAGS) -I$(PB_SRC_DIR) -o $@ $^ \$(PROTOBUF_LIB) $(ABSL_LIBS) $(UTF8_RANGE_LIB) -Wl,--end-group \clean: $(PB_SRC_DIR) testdebug: "PROTOBUF_LIB: $(PROTOBUF_LIB) " "INC_FLAGS: $(INC_FLAGS) " "PB_SRC_DIR: $(PB_SRC_DIR) " "PB_SRC: $(PB_SRC) " .PHONY : proto test clean
上方写头文件的索引的时候,指定对应的目录,编译器会搜索对应的头文件,因此不需要写成完全的相对路径或者绝对路径,所以我的test.cc文件中的头文件是用了"test.pb.h" ,路径匹配的事情交给编译器
proto的设计逻辑是,我在当前编译的目录下创建了tmp_dir,然后将protoc编译生成的文件输出到这个文件夹下
$< 指的是依赖第一项
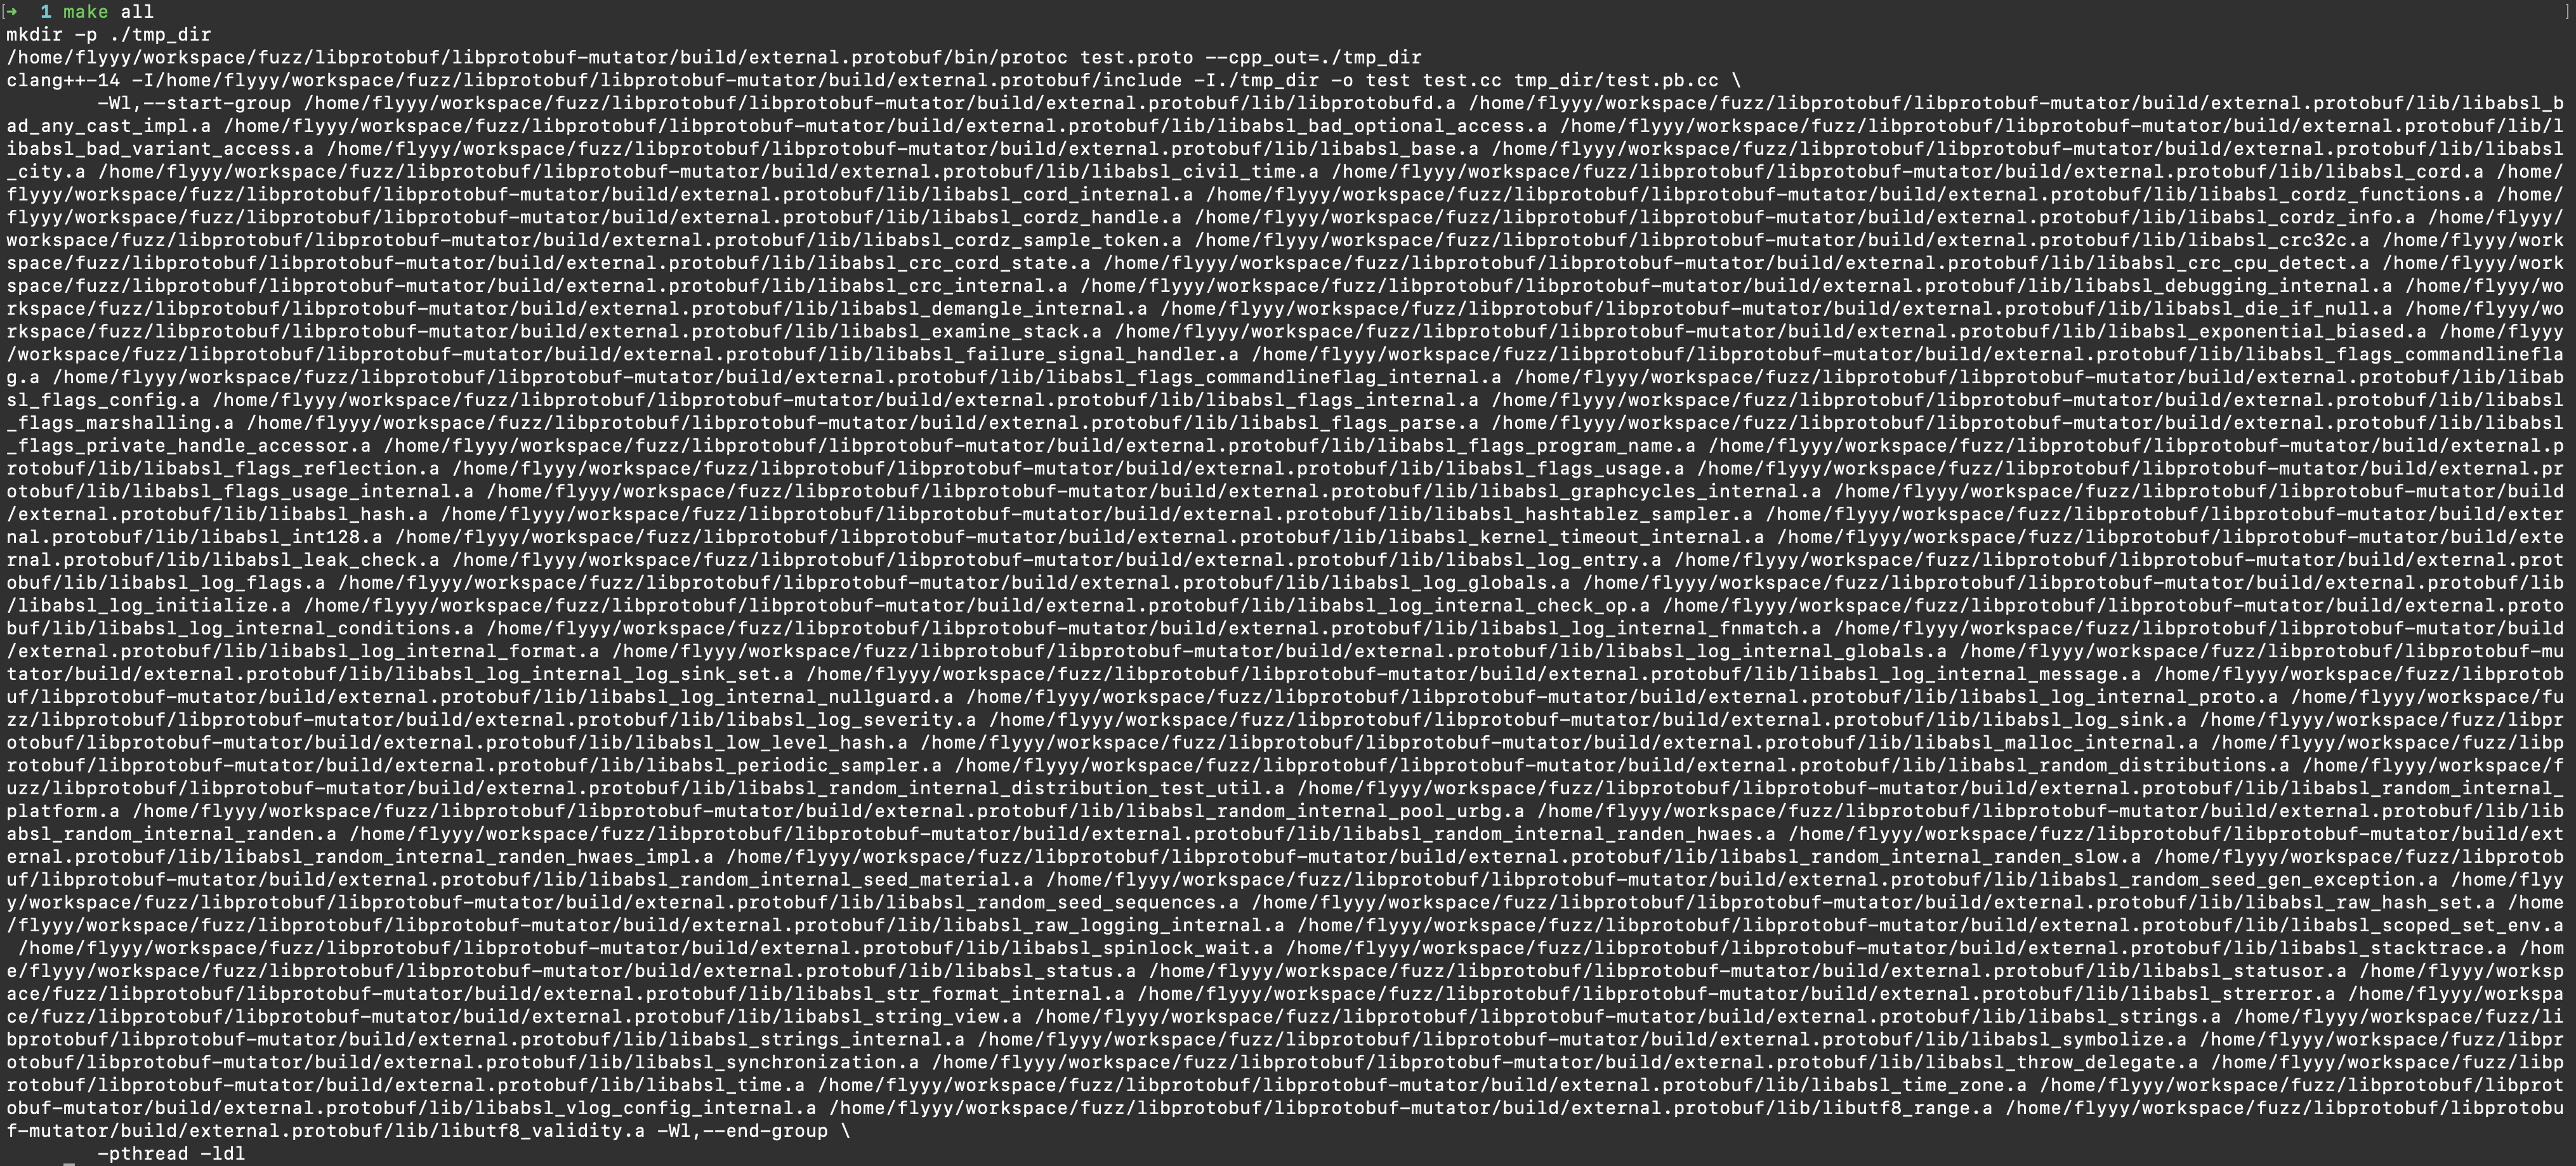
test的需要提一嘴,之前可能只需要指定一两个静态库,同时注意顺序就行,但是由于protobuf的更新,各个静态库之间的调用也越来越复杂,所以各个库之间的调用关系越来越复杂,存在循环调用,所以我采用了-Wl,–start-group –end-group的结构,只需要指定需要的静态库,然后这里会自动处理他们的调用关系,可以看下图就是很好的说明,这几个库之间的循环调用很复杂。下面的-pthread是正常选项,最后的-ldl是为了可以使用动态链接库。
正常的test执行会有如下输出
1 2 3 4 5 6 7 ➜ 1 ./test
libprotobuf和libfuzzer的简单联动 - 基本使用 先设置harness.cc,这是需要fuzz的目标函数,逻辑很简单,当libfuzzer变异生成的data[0]==’\x01’时,触发crash
1 2 3 4 5 6 7 8 9 #include <stdint.h> #include <stddef.h> extern "C" int FuzzTEST (const uint8_t *data, size_t size) if (data[0 ] == '\x01' ) {return 0 ;
lpm_libfuzz.cc
下面的头文件只写了部分路径,剩下的就交给编译器寻找。
这个函数ProtobufTodata从函数签名就可以看出来,使用来变异data的,需要留意的是其中有一个环境变量的获取getenv(“LPM_DUMP_PATH”),这里如果开启,则可以将当前的message保存到本地路径下,这个也许可以成为保存种子的方法?
需要注意到FuzzTEST的函数签名,第一个参数类型是const uint8_t *data,所以我这里调用reinterpret_cast将LPM_DATA的类型转化成const uint8_t *data
使用这个const auto&是为了避免拷贝,直接引用了message的a字段
1 2 3 4 5 6 7 8 9 10 11 12 13 14 15 16 17 18 19 20 21 22 23 24 25 26 27 28 29 30 31 32 33 34 35 36 37 38 39 40 #include <cstdint> #include <string> #include <fstream> #include "test.pb.h" #include "src/libfuzzer/libfuzzer_macro.h" extern "C" int FuzzTEST (const uint8_t *data, size_t size) std::string ProtobufTodata (TEST message) {const auto & field_1 = message.a ();const auto & field_2 = message.b ();write (reinterpret_cast <const char *>(&field_1), sizeof (field_1));if (field_2. size () > 0 ) {write (field_2. c_str (), field_2. size ());str ();if (const char *dump_path = getenv ("LPM_DUMP_PATH" )) {std::ofstream dump_file (dump_path, std::ios::binary) ;write (res.data (), res.size ());close ();return res;DEFINE_PROTO_FUZZER (const TEST& message) {ProtobufTodata (message);FuzzTEST (reinterpret_cast <const uint8_t *>(LPM_DATA.data ()),size ()
下面是Makefile
1 2 3 4 5 6 7 8 9 10 11 12 13 14 15 16 17 18 19 20 21 22 23 24 25 26 27 28 29 30 31 32 33 34 35 36 CXX = clang++-14$(PB_SRC_DIR) /test.pb.cc$(PB_SRC_DIR) -I$(PROTOBUF_DIR) /include $(HOME) /workspace/fuzz/libprotobuf/libprotobuf-mutator$(LPM_DIR) /build/external.protobuf$(PROTOBUF_DIR) /lib/libprotobufd.a$(wildcard $(PROTOBUF_DIR) /lib/libabsl*.a) $(wildcard $(PROTOBUF_DIR) /lib/libutf8*.a) $(LPM_DIR) /build/src/libfuzzer/libprotobuf-mutator-libfuzzer.a \$(LPM_DIR) /build/src/libprotobuf-mutator.a$(PB_SRC_DIR) -I$(LPM_DIR) all: $(TARGET) harness.o: harness.cc $(CXX) $(CXXFLAGS) $(CPPFLAGS) $(DLLVMENTRY_POINT) -c $< -o $@ $(TARGET) : harness.o lpm_libfuzz.cc $(PB_SRC) $(CXX) $(CXXFLAGS) $(CPPFLAGS) $(INC_FLAGS) \$@ harness.o lpm_libfuzz.cc $(PB_SRC) \$(LPM_LIB) $(PROTOBUF_LIB) $(ABSL_LIBS) $(UTF8_RANGE_LIB) -Wl,--end-group \clean: $(TARGET) harness.o.PHONY : all clean
注意下这里DLLVMENTRY_POINT = -DLLVMFuzzerTestOneInput=FuzzTEST。在编译时,预处理器会把所有的 LLVMFuzzerTestOneInput 文本替换为 FuzzTEST,而对于libfuzzer来说,入口函数为LLVMFuzzerTestOneInput,通过这样替换之后,入口函数就变成了FuzzTEST
剩下的头文件目录和静态链接库只需要注意别出错就行,我本地路径为这样,所以当我使用test.pb.cc的是欧路径的目录指定为”../1/tmp_dir”
1 2 3 4 5 6 7 8 9 10 11 12 13 14 15 16 17 18 19 20 21 22 23 24 ./
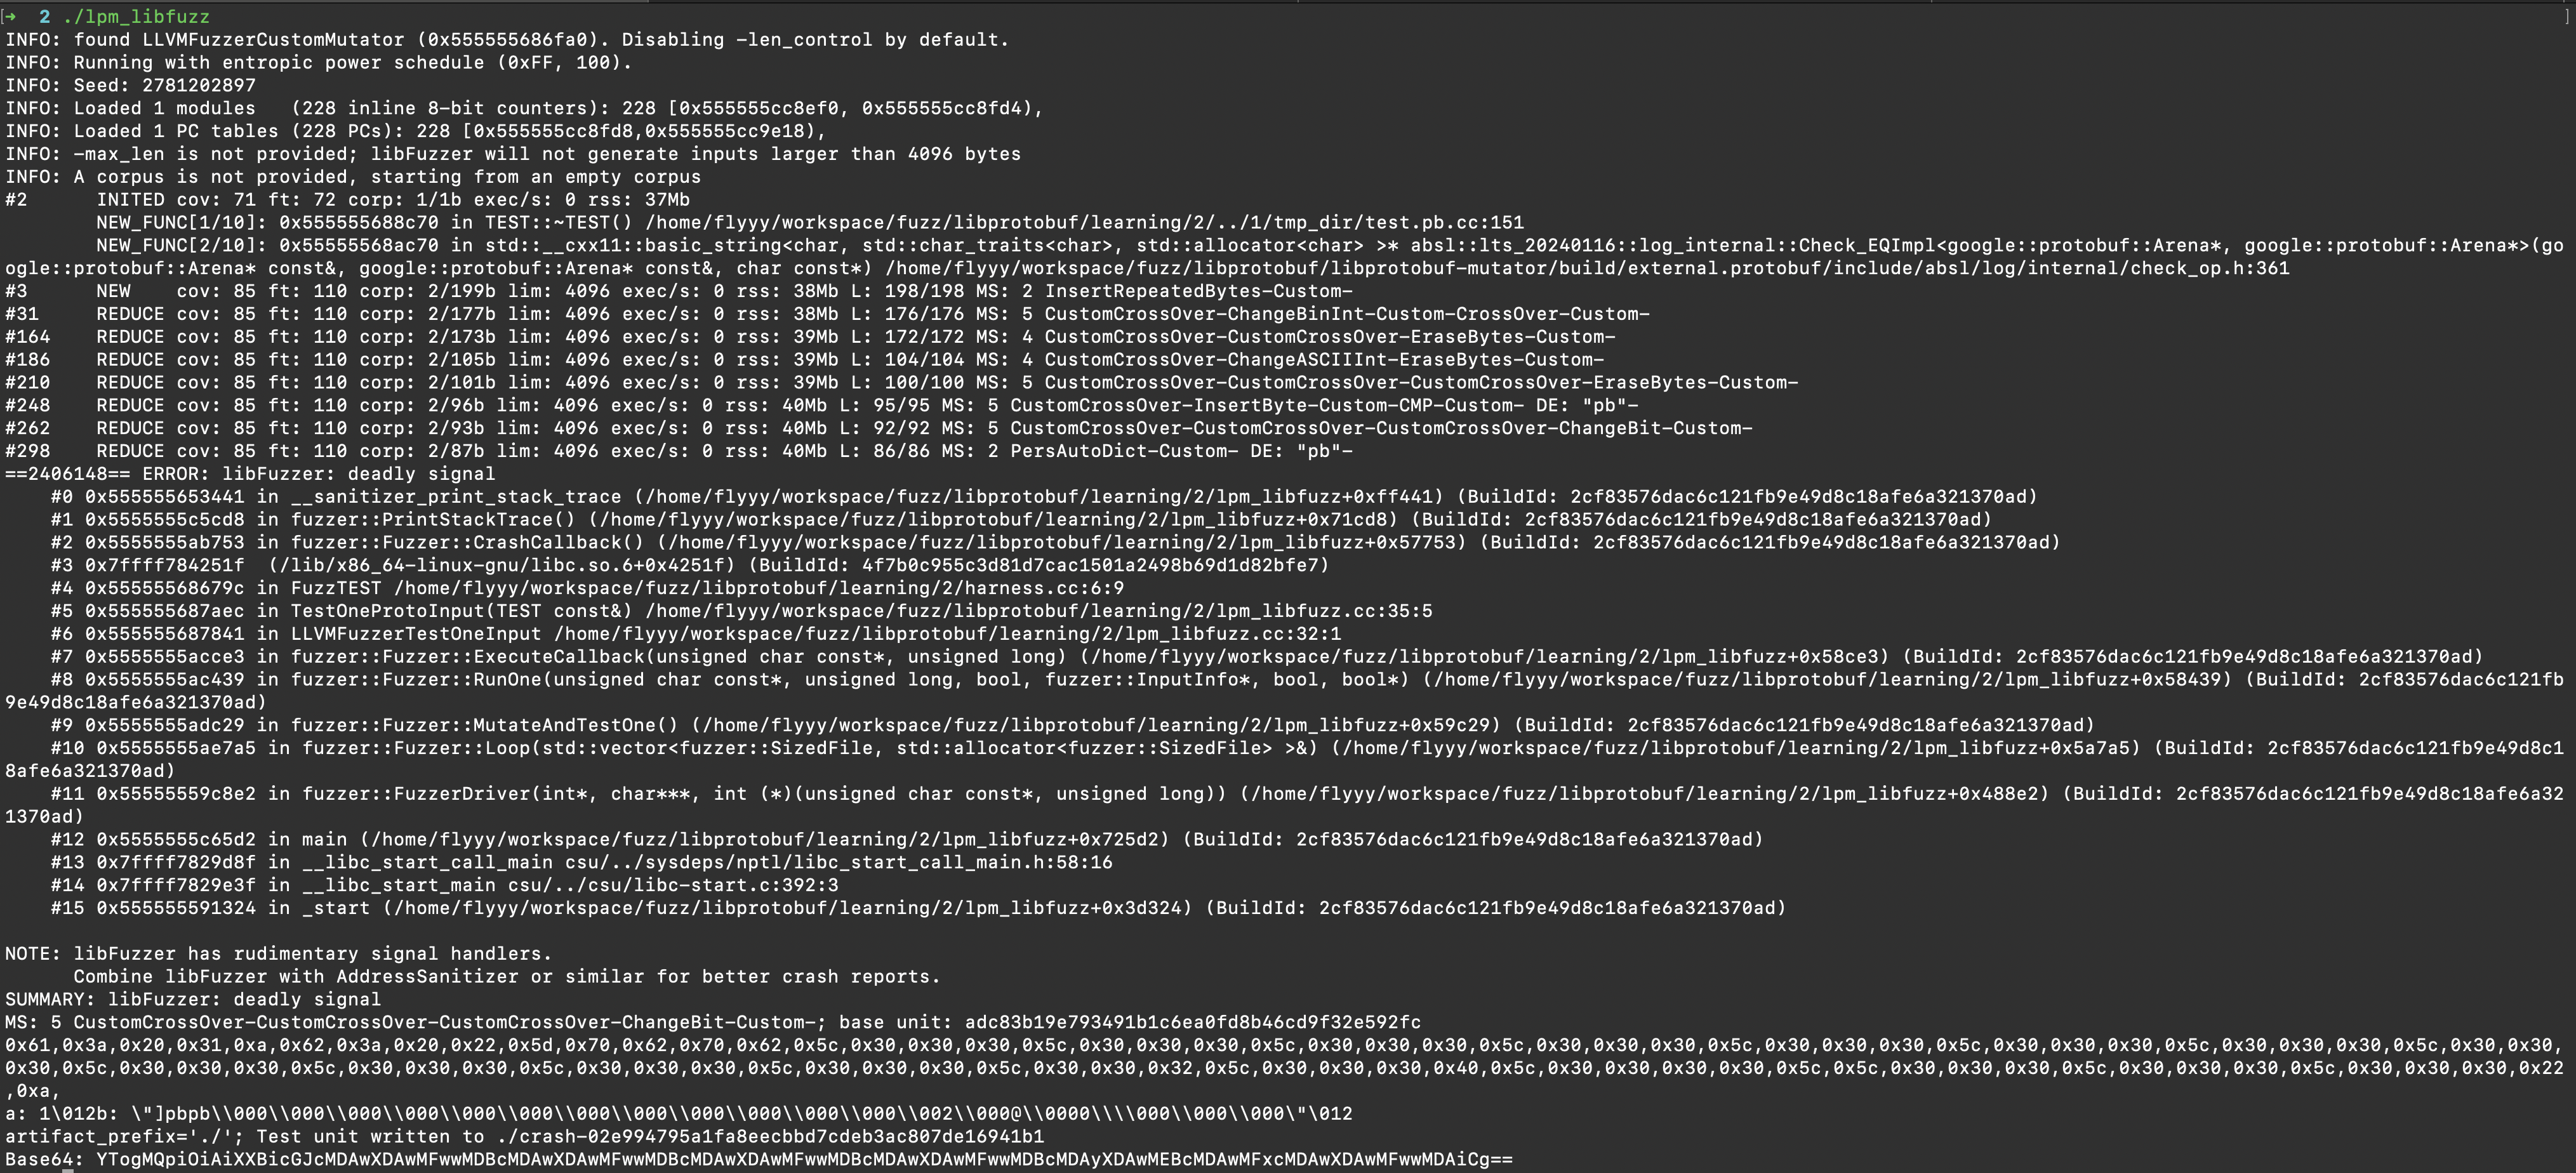
接着就执行编译好的libfuzzer,下面是crash的信息,crash的样本也进行了保存
样本内容如下
1 2 3 4 ➜ 2 cat crash-02e994795a1fa8eecbbd7cdeb3ac807de16941b1 "]pbpb\000\000\000\000\000\000\000\000\000\000\000\000\002\000@\0000\\000\000\000"
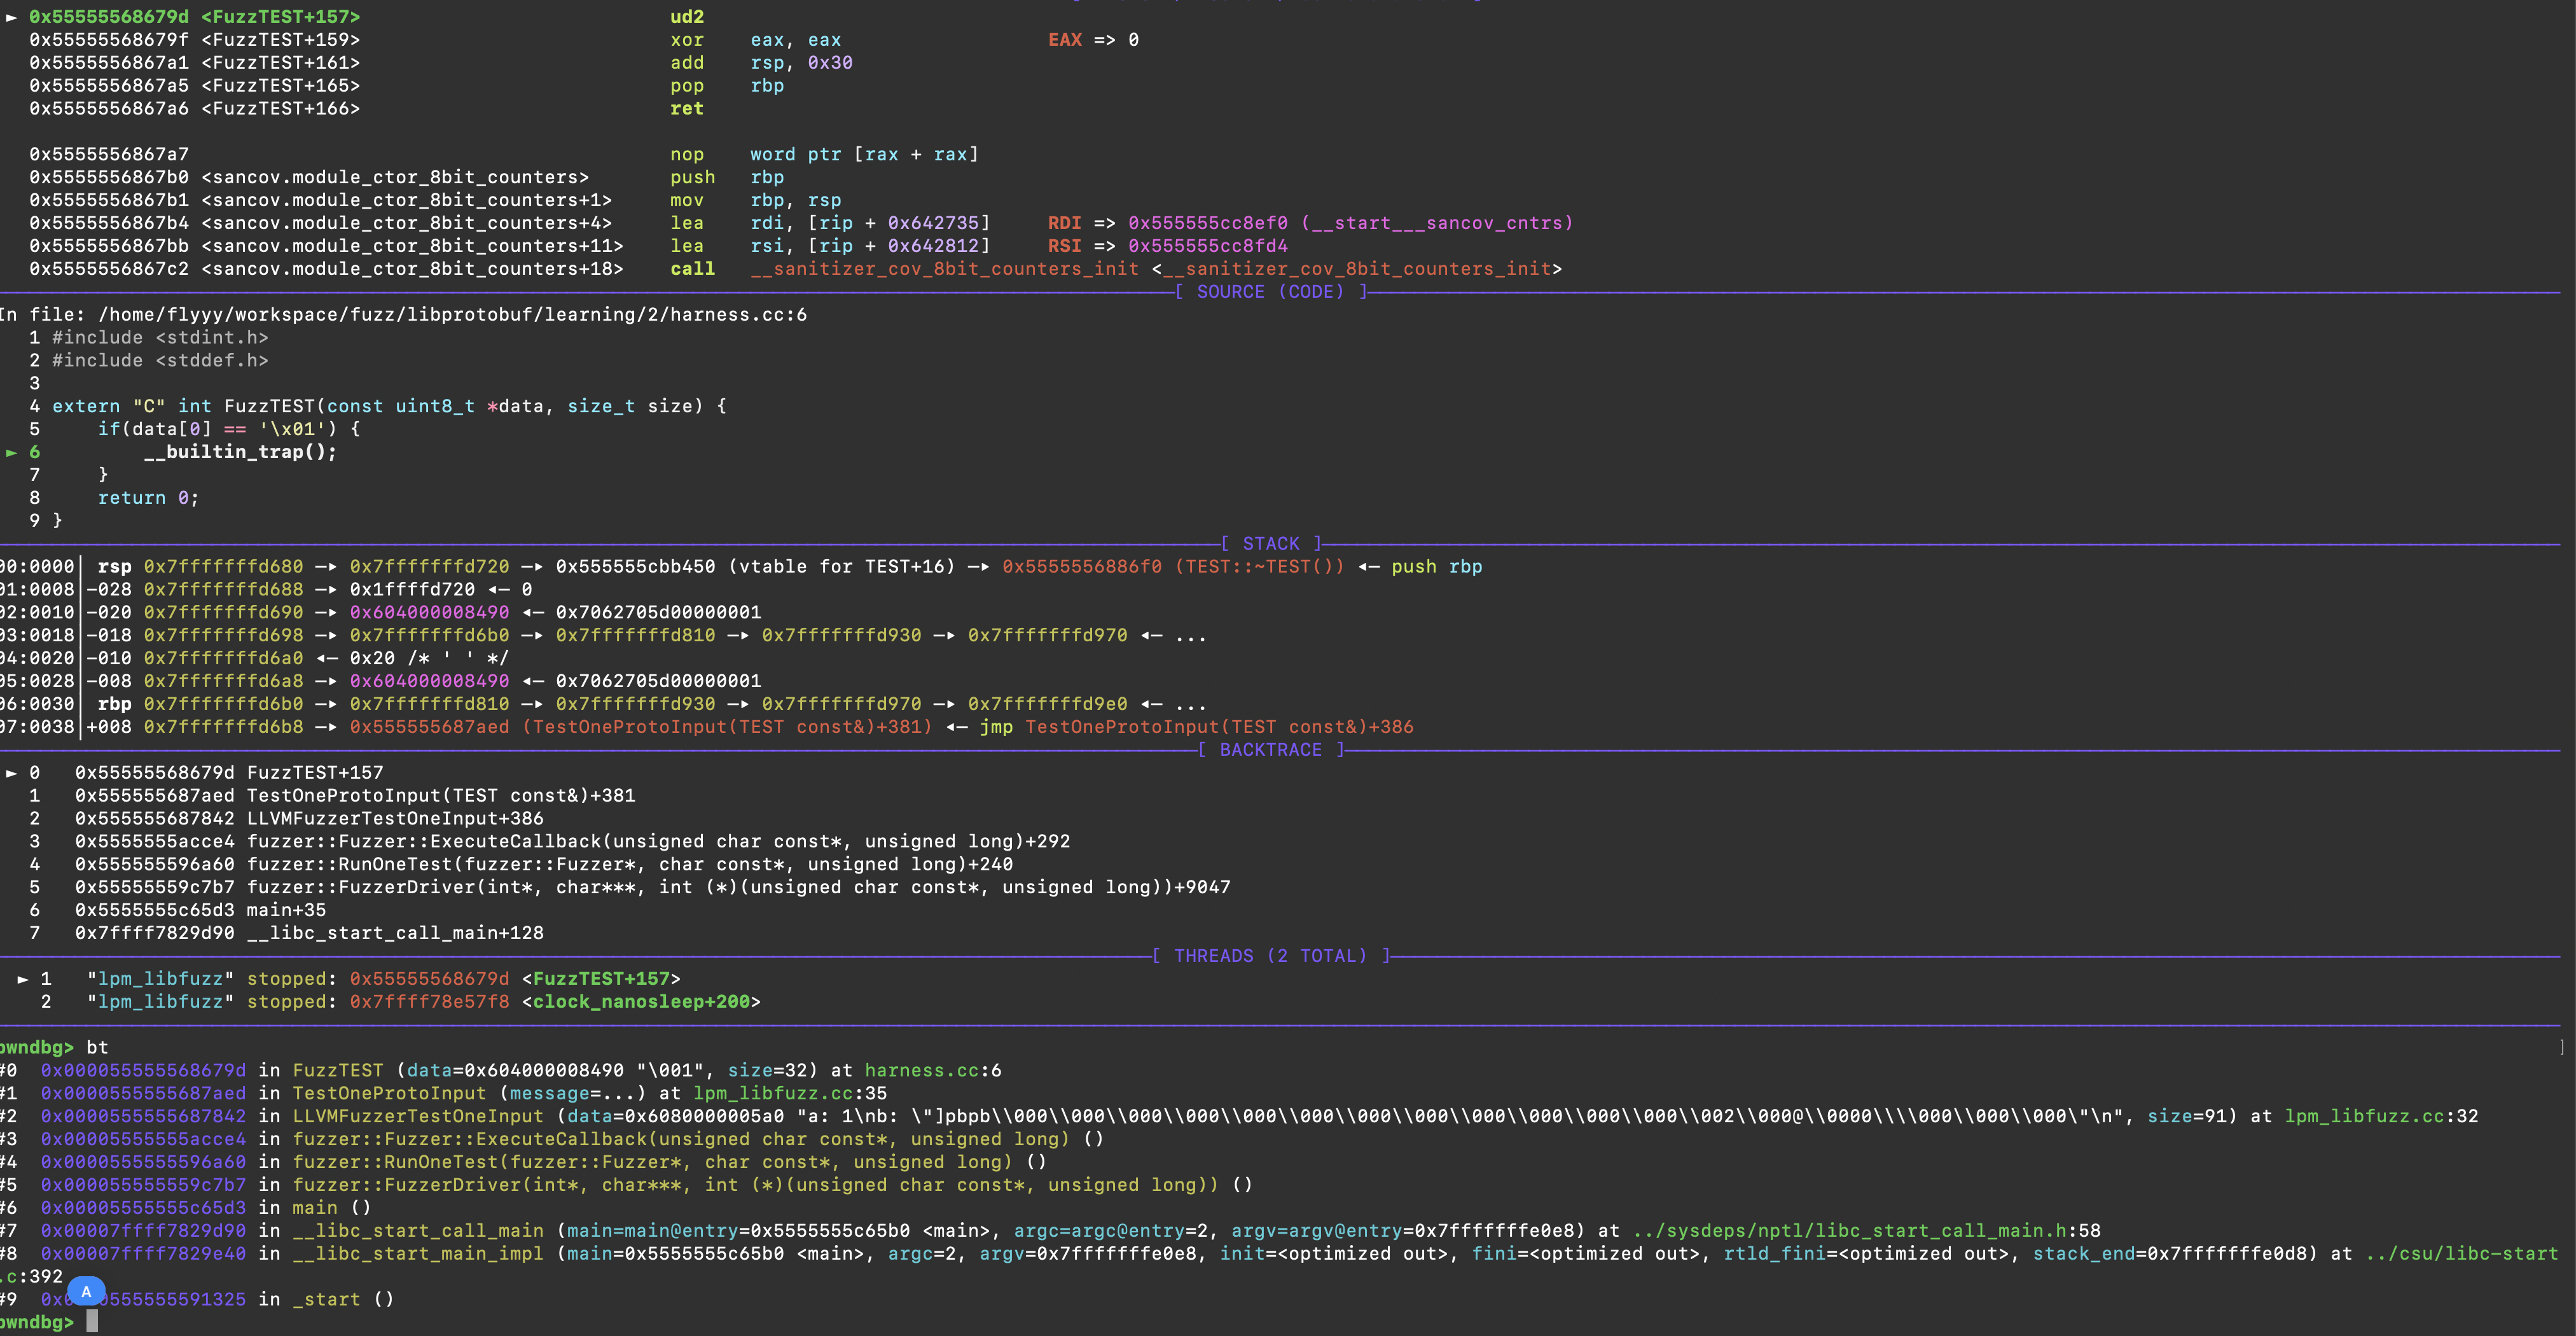
接着可以使用gdb调试,这里需要注意的是不能开启asan,所以需要设置环境变量ASAN_OPTIONS=detect_leaks=0,也可以直接执行ASAN_OPTIONS=detect_leaks=0 gdb ./lpm_libfuzz,接着再run crash-02e994795a1fa8eecbbd7cdeb3ac807de16941b1,看栈回溯就行
需要注意的一个于序列化相关的问题 ,待补充
libprotobuf和libfuzzer的简单联动 - 构建变异约束 这里和上方的基本使用代码基本完全一致,只有发送了变化lpm_libfuzz.cc
1 2 3 4 5 6 7 8 9 10 11 12 13 14 15 16 17 18 19 20 21 22 23 24 25 26 27 28 29 30 31 32 33 34 35 36 37 38 39 40 41 42 43 44 45 46 47 48 49 50 51 52 53 54 55 56 57 58 59 60 61 #include <cstdint> #include <string> #include <fstream> #include "test.pb.h" #include "src/libfuzzer/libfuzzer_macro.h" bool is_custom_mutation = false ;extern "C" int FuzzTEST (const uint8_t *data, size_t size) std::string ProtobufTodata (TEST message) {const auto & field_1 = message.a ();const auto & field_2 = message.b ();write (reinterpret_cast <const char *>(&field_1), sizeof (field_1));if (field_2. size () > 0 ) {write (field_2. c_str (), field_2. size ());str ();if (const char *dump_path = getenv ("LPM_DUMP_PATH" )) {std::ofstream dump_file (dump_path, std::ios::binary) ;write (res.data (), res.size ());close ();return res;DEFINE_PROTO_FUZZER (const TEST& message) {if (!is_custom_mutation) {RegisterPostProcessor (descriptor (),unsigned int seed) {reinterpret_cast <TEST*>(message);if (seed % 2 == 0 ) {set_b ("flyyy" );else {set_b ("yyylf" );true ;return ;ProtobufTodata (message);FuzzTEST (reinterpret_cast <const uint8_t *>(LPM_DATA.data ()),size ()
主要添加了一个注册的函数,类似于AFL里的posthandler函数。在libfuzz里是protobuf_mutator::libfuzzer::RegisterPostProcessor()函数,第一个参数是TEST::descriptor(),第二个参数是一个lambda函数,这个函数的第一个参数是protobuf的原始类型,第二个参数是seed
进入流程之后,首先将message的类型转换一下,接着是约束的逻辑,要么是”flyyy”,要么是”yyylf”。然后设置标志位,这个注册函数只执行一次
容易产生疑问的是这个RegisterPostProcessor的作用是否可以被如下的代码片段替代
1 2 3 4 5 6 7 8 9 10 11 12 13 14 DEFINE_PROTO_FUZZER (const TEST &test_proto) {if (test_proto.b () != "FUCK" && test_proto.b () != "SHIT" ) {set_b ("FUCK" ); if (modified.b () != "FUCK" && modified.b () != "SHIT" ) {set_b ("FUCK" );auto s = ProtoToData (modified);FuzzTEST (...);
答案是不可以,因为如果已经可以执行到上方的逻辑,说明此时的data已经发生了变异,如果此时再发生自定义的变化,那么会影响覆盖率引导,fuzzer不知道修改了什么。
比如说fuzzer生成的data是”123456”,但是这里被这里修改成了”FUCK”,那么这里得到的路径反馈是基于”FUCK”而不是”123456”,这个就造成了问题
为什么上方使用RegisterPostProcessor不会这样,看下面的执行流程图
1 2 3 4 5 6 7 RegisterPostProcessor 的流程:
第一次调用DEFINE_PROTO_FUZZER时的执行流程
1 2 3 4 5 Fuzzer 变异 → 生成 message → 调用 DEFINE_PROTO_FUZZER
第二次调用DEFINE_PROTO_FUZZER时的执行流程
1 2 3 4 5 6 7 Fuzzer 变异 → Post Processor 修改 → 生成最终 message → 调用 DEFINE_PROTO_ FUZZER (这里 b 被改成 "flyyy" 或 "yyylf") ↓ 跳过注册部分 ↓ ProtobufTodata(message) ↓ FuzzTEST(...) ← 执行目标
AFL++使用自定义变异策略 AFL++环境准备 首先得把AFL++给编译一下,我这里只采用源码fuzz,所以为了节省时间就使用了source-only
1 2 3 4 $ git clone https://github.com/AFLplusplus/AFLpluspluscd AFLplusplus
部分源码分析 阅读官方的doc:https://aflplus.plus/docs/custom_mutators/#custom-mutation ,寻找我们需要使用的C语言的API,同时也提供了python版本
1 2 3 4 5 void *afl_custom_init (afl_state_t *afl, unsigned int seed) ;size_t afl_custom_fuzz (void *data, unsigned char *buf, size_t buf_size, unsigned char **out_buf, unsigned char *add_buf, size_t add_buf_size, size_t max_size) ;void afl_custom_deinit (void *data) ;size_t afl_custom_post_process (void *data, unsigned char *buf, size_t buf_size, unsigned char **out_buf) ;
使用方法也很简单,将需要的自定义逻辑编译成so
1 gcc -shared -Wall -O3 example.c -o example.so
设置环境变量为so的路径即可
1 export AFL_CUSTOM_MUTATOR_LIBRARY="/full/path/to/example_first.so;/full/path/to/example_second.so"
一般来说使用自定义变异的时候就不启用trim了,这个会破坏我们的样本,所以可以通过设置export AFL_DISABLE_TRIM=1
看过API和使用方法之后,之后可以大致看一下这些API在源码里是怎么调用的
调用栈如下
1 2 3 4 5 ………
setup_custom_mutators
这里会通过”;”来分割so的路径,然后逐个调用load_custom_mutator
1 2 3 4 5 6 7 8 9 10 11 12 13 14 15 16 17 18 19 20 21 22 23 24 25 26 27 28 29 30 31 32 33 34 35 36 37 38 39 40 41 42 43 44 void setup_custom_mutators (afl_state_t *afl) {struct custom_mutator *mutator ;0 ;if (fn) {if (afl->limit_time_sig && afl->limit_time_sig != -1 )"MOpt and custom mutator are mutually exclusive. We accept pull " "requests that integrates MOpt with the optional mutators " "(custom/redqueen/...)." );char **)&fn, ";:," );if (likely(!fn_token)) {else {while (fn_token) {if (*fn_token) { if (afl->not_on_tty && afl->debug)"[Custom] Processing: %s\n" , fn_token);if (prev_mutator_count > afl->custom_mutators_count)"Maximum Custom Mutator count reached." );char **)&fn, ";:," );
load_custom_mutator
接着通过dlopen打开so文件, 然后通过dlsym获取各个函数,最后完成初始化,流程还是很简单的
1 2 3 4 5 6 7 8 9 10 11 12 13 14 15 16 17 18 19 20 21 22 23 24 struct custom_mutator *load_custom_mutator (afl_state_t *afl, const char *fn) {void *dh;struct custom_mutator *mutator =sizeof (struct custom_mutator));if (memchr (fn, '/' , strlen (fn))) {strrchr (fn, '/' ) + 1 );else {if (strlen (mutator->name_short) > 22 ) { mutator->name_short[21 ] = 0 ; }"Loading custom mutator library from '%s'..." , fn);if (!dh) FATAL("%s" , dlerror());
通过查询AFL++项目里的一些example,可以得知这些函数的用法,主要位于这个目录下
1 2 3 4 5 6 7 8 9 10 11 12 13 14 15 16 17 18 19 20 21 22 23 24 25 26 ➜ custom_mutators git:(stable) tree ./ -L 1 ./ ├── Android.bp ├── README.md ├── aflpp ├── aflpp_ tritondse_send_ tcp_mutator ├── guifuzz ├── honggfuzz ├── libafl_ base_mutators git:(stable)
简单的分析下example,首先需要注意的是头文件的部分,这个后续写makefile需要注意到
mutator的结构体,这个例子用了很多的功能,包括trim和post_process。其中的mutated_out是用于存储fuzz data的
1 2 3 4 5 6 7 8 9 10 11 12 typedef struct my_mutator {afl_state_t *afl;size_t trim_size_current;int trimmming_steps;int cur_step;my_mutator_t ;
afl_custom_init:
afl_state_t *afl是一个全局的指针,所以这里不需要特别关注,函数体的主要逻辑是为我们创建的结构体分配内存,同时赋值 data->afl = afl,然后返回data
1 2 3 4 5 6 7 8 9 10 11 12 13 14 15 16 17 18 19 20 21 22 23 24 25 26 27 28 29 30 31 32 33 34 35 36 37 38 39 40 41 42 43 44 45 46 47 48 49 my_mutator_t *afl_custom_init (afl_state_t *afl, unsigned int seed) {my_mutator_t *data = calloc (1 , sizeof (my_mutator_t ));if (!data) {"afl_custom_init alloc" );return NULL ;if ((data->mutated_out = (u8 *)malloc (MAX_FILE)) == NULL ) {"afl_custom_init malloc" );return NULL ;if ((data->post_process_buf = (u8 *)malloc (MAX_FILE)) == NULL ) {"afl_custom_init malloc" );return NULL ;if ((data->trim_buf = (u8 *)malloc (MAX_FILE)) == NULL ) {"afl_custom_init malloc" );return NULL ;return data;
afl_custom_fuzz:
这里主要就是执行变异的拷贝,为后续的fuzz提供数据。下方的command是前面定义的结构体,out_buf的值存储了out的指针值,也就是保存了out的指针值
1 2 3 4 5 6 7 8 9 10 11 12 13 14 15 16 17 18 19 20 21 22 23 24 25 26 27 28 29 30 31 32 33 34 35 36 37 38 39 40 41 42 43 44 45 static const char *commands[] = {"GET" ,"PUT" ,"DEL" ,size_t afl_custom_fuzz (my_mutator_t *data, uint8_t *buf, size_t buf_size, u8 **out_buf, uint8_t *add_buf, size_t add_buf_size, size_t max_size) {size_t mutated_size = DATA_SIZE <= max_size ? DATA_SIZE : max_size;memcpy (data->mutated_out, buf, buf_size);memcpy (data->mutated_out, commands[rand() % 3 ], 3 );if (mutated_size > max_size) { mutated_size = max_size; }return mutated_size;
afl_custom_deinit:
这里就是清空之前分配的内存,防止内存泄漏
1 2 3 4 5 6 7 8 9 10 11 12 13 14 void afl_custom_deinit (my_mutator_t *data) {free (data->post_process_buf);free (data->mutated_out);free (data->trim_buf);free (data);
其中afl_custom_post_process的作用记录一下,虽然这次实践并没有使用到。这个API主要用于对变异之后的数据进行一个规整,可以加上自己的一些判断,比如说验证语法的正确性,协议数据的合理性…………
需要特别注意的地方是,如果这个API里的校验流程特别耗时间,则会降低fuzz的效率
实践 我这里还是想要通过ASAN的方式去验证crash,所以用clang++编译,同时加上-fsanitize=address -g参数
让ai随便写了一个vuln.cc
1 2 3 4 5 6 7 8 9 10 11 12 13 14 15 16 17 18 19 20 21 22 23 24 25 26 27 28 29 30 31 32 33 34 35 36 37 38 39 40 41 42 43 44 45 #include <cstdint> #include <cstdio> #include <cstring> #include <cstdlib> int main (int argc, char **argv) if (argc != 2 ) {fprintf (stderr, "Usage: %s <input_file>\n" , argv[0 ]);return 1 ;fopen (argv[1 ], "rb" );if (!fp) return 1 ;fseek (fp, 0 , SEEK_END);size_t size = ftell (fp);fseek (fp, 0 , SEEK_SET);uint8_t *data = (uint8_t *)malloc (size);fread (data, 1 , size, fp);fclose (fp);if (size < 4 ) {free (data);return 0 ;uint32_t a;memcpy (&a, data, sizeof (a));size_t string_len = size - 4 ;const uint8_t *string_data = data + 4 ;if (a == 0x01 ) {char buffer[16 ]; memcpy (buffer, string_data, string_len); printf ("Buffer: %s\n" , buffer);free (data);return 0 ;
接着编写afl_lpm_mutator.cc,首先定义了一个结构体
1 2 3 4 5 typedef struct my_mutator {afl_state_t *afl;size_t mutator_buf_size;my_mutator_t ;
接着ProtobufTodata函数和上面的例子还是一样的,将结构化的数据转化为字节流
由于的我的为.cc文件,并且AFL++的接口都是提供C语言,所以我下面的所有函数功能都需要在extern "C" {……} 中,这个就是对内采用部分的C++语言实现,对外暴露为C语言的接口
afl_custom_fuzz
我这里用了PLM的Mutator,接着通过ParseFromArray将buf转化为结构化数据,如果这里的数据无法转化为结构化数据,说明是有问题的,因此会进入到下面的逻辑,随机赋值一个数+设定死一个string
下面就是正常的数据转化和拷贝,内存的扩容……
1 2 3 4 5 6 7 8 9 10 11 12 13 14 15 16 17 18 19 20 21 22 23 24 25 26 27 28 29 30 31 32 33 34 35 36 37 size_t afl_custom_fuzz (my_mutator_t *data, uint8_t *buf, size_t buf_size, u8 **out_buf, uint8_t *add_buf, size_t add_buf_size, size_t max_size) static protobuf_mutator::Mutator mutator;if (buf_size > 0 && message.ParseFromArray (buf, buf_size)) {Mutate (&message, max_size);else {set_a (rand () % 305 );set_b ("test_string" );if (rand () % 2 == 0 ) {set_b ("flyyy" );ProtobufTodata (message);size_t output_size = raw_data.size ();if (output_size > max_size) {if (output_size > data->mutator_buf_size) {realloc (data->mutator_buf, output_size);memcpy (data->mutator_buf, raw_data.c_str (), output_size);return output_size;
剩下的两个函数就很简单了,为我们的结构体分配内存/流程结束之后释放内存
1 2 3 4 5 6 7 8 9 10 11 12 13 14 15 16 17 18 19 20 21 22 23 24 my_mutator_t *afl_custom_init (afl_state_t *afl, unsigned int seed) {my_mutator_t *data = (my_mutator_t *)calloc (1 , sizeof (my_mutator_t ));if (!data) {"afl_custom_init alloc" );return NULL ;calloc (1 , MAX_FILE);if (!data->mutator_buf) {"afl_custom_init malloc" );return NULL ;return data;void afl_custom_deinit (my_mutator_t *data) {free (data->mutator_buf);free (data);
头文件里多了一个#include "afl-fuzz.h" 所以需要加上这个的路径,这次fuzz使用的是AFL++,因此也不使用libfuzz的头文件,只使用LPM的Mutator,所以最后的代码如下
1 2 3 4 5 6 7 8 9 10 11 12 13 14 15 16 17 18 19 20 21 22 23 24 25 26 27 28 29 30 31 32 33 34 35 36 37 38 39 40 41 42 43 44 45 46 47 48 49 50 51 52 53 54 55 56 57 58 59 60 61 62 63 64 65 66 67 68 69 70 71 72 73 74 75 76 77 78 79 80 81 82 83 84 85 86 87 88 89 90 91 92 93 94 95 96 97 98 99 100 101 102 103 104 105 106 107 108 109 110 111 #include <iostream> #include <sstream> #include <cstring> #include <cstdlib> #include <string> #include <fstream> #include "afl-fuzz.h" #include "test.pb.h" #include "src/mutator.h" typedef struct my_mutator {afl_state_t *afl;size_t mutator_buf_size;my_mutator_t ;std::string ProtobufTodata (TEST message) {const auto & field_1 = message.a ();const auto & field_2 = message.b ();write (reinterpret_cast <const char *>(&field_1), sizeof (field_1));if (field_2. size () > 0 ) {write (field_2. c_str (), field_2. size ());str ();if (const char *dump_path = getenv ("LPM_DUMP_PATH" )) {std::ofstream dump_file (dump_path, std::ios::binary) ;write (res.data (), res.size ());close ();return res;extern "C" {my_mutator_t *afl_custom_init (afl_state_t *afl, unsigned int seed) srand (seed);my_mutator_t *data = (my_mutator_t *)calloc (1 , sizeof (my_mutator_t ));if (!data) {perror ("afl_custom_init alloc" );return NULL ;calloc (1 , MAX_FILE);if (!data->mutator_buf) {perror ("afl_custom_init malloc" );return NULL ;return data;size_t afl_custom_fuzz (my_mutator_t *data, uint8_t *buf, size_t buf_size, u8 **out_buf, uint8_t *add_buf, size_t add_buf_size, size_t max_size) static protobuf_mutator::Mutator mutator;if (buf_size > 0 && message.ParseFromArray (buf, buf_size)) {Mutate (&message, max_size);else {set_a (rand () % 305 );set_b ("test_string" );if (rand () % 2 == 0 ) {set_b ("flyyy" );ProtobufTodata (message);size_t output_size = raw_data.size ();if (output_size > max_size) {if (output_size > data->mutator_buf_size) {realloc (data->mutator_buf, output_size);memcpy (data->mutator_buf, raw_data.c_str (), output_size);return output_size;void afl_custom_deinit (my_mutator_t *data) free (data->mutator_buf);free (data);
Makefile的内容如下
1 2 3 4 5 6 7 8 9 10 11 12 13 14 15 16 17 18 19 20 21 22 23 24 25 26 27 28 29 30 31 32 33 34 35 36 37 38 39 40 41 42 43 44 45 CXX = clang++-14$(PB_SRC_DIR) /test.pb.cc$(PB_SRC_DIR) -I$(PROTOBUF_DIR) /include $(HOME) /workspace/fuzz/libprotobuf/libprotobuf-mutator$(LPM_DIR) /build/external.protobuf$(PROTOBUF_DIR) /lib/libprotobufd.a$(wildcard $(PROTOBUF_DIR) /lib/libabsl*.a) $(wildcard $(PROTOBUF_DIR) /lib/libutf8*.a) $(LPM_DIR) /build/src/libprotobuf-mutator.a$(HOME) /workspace/fuzz/libprotobuf/learning/AFLplusplus$(PB_SRC_DIR) -I$(LPM_DIR) -I$(AFLPP_DIR) /include all: $(TARGET) $(FUZZ_TARGET) $(FUZZ_TARGET) : $(FUZZ_TARGET) .cc$(AFLPP_DIR) /afl-clang-fast++ -o $@ $^ -fsanitize=address -g$(TARGET) : afl_lpm_mutator.cc $(PB_SRC) $(CXX) -shared -Wall -O3 $(CXXFLAGS) $(CPPFLAGS) $(INC_FLAGS) \$@ $^ \$(LPM_LIB) $(PROTOBUF_LIB) $(ABSL_LIBS) $(UTF8_RANGE_LIB) -Wl,--end-group \fuzz: $(AFLPP_DIR) /afl-fuzz -i input_dir -o output_dir -- ./$(FUZZ_TARGET) @@clean: $(TARGET) $(FUZZ_TARGET) debug: "AFLPP_DIR: $(AFLPP_DIR) " .PHONY : all clean
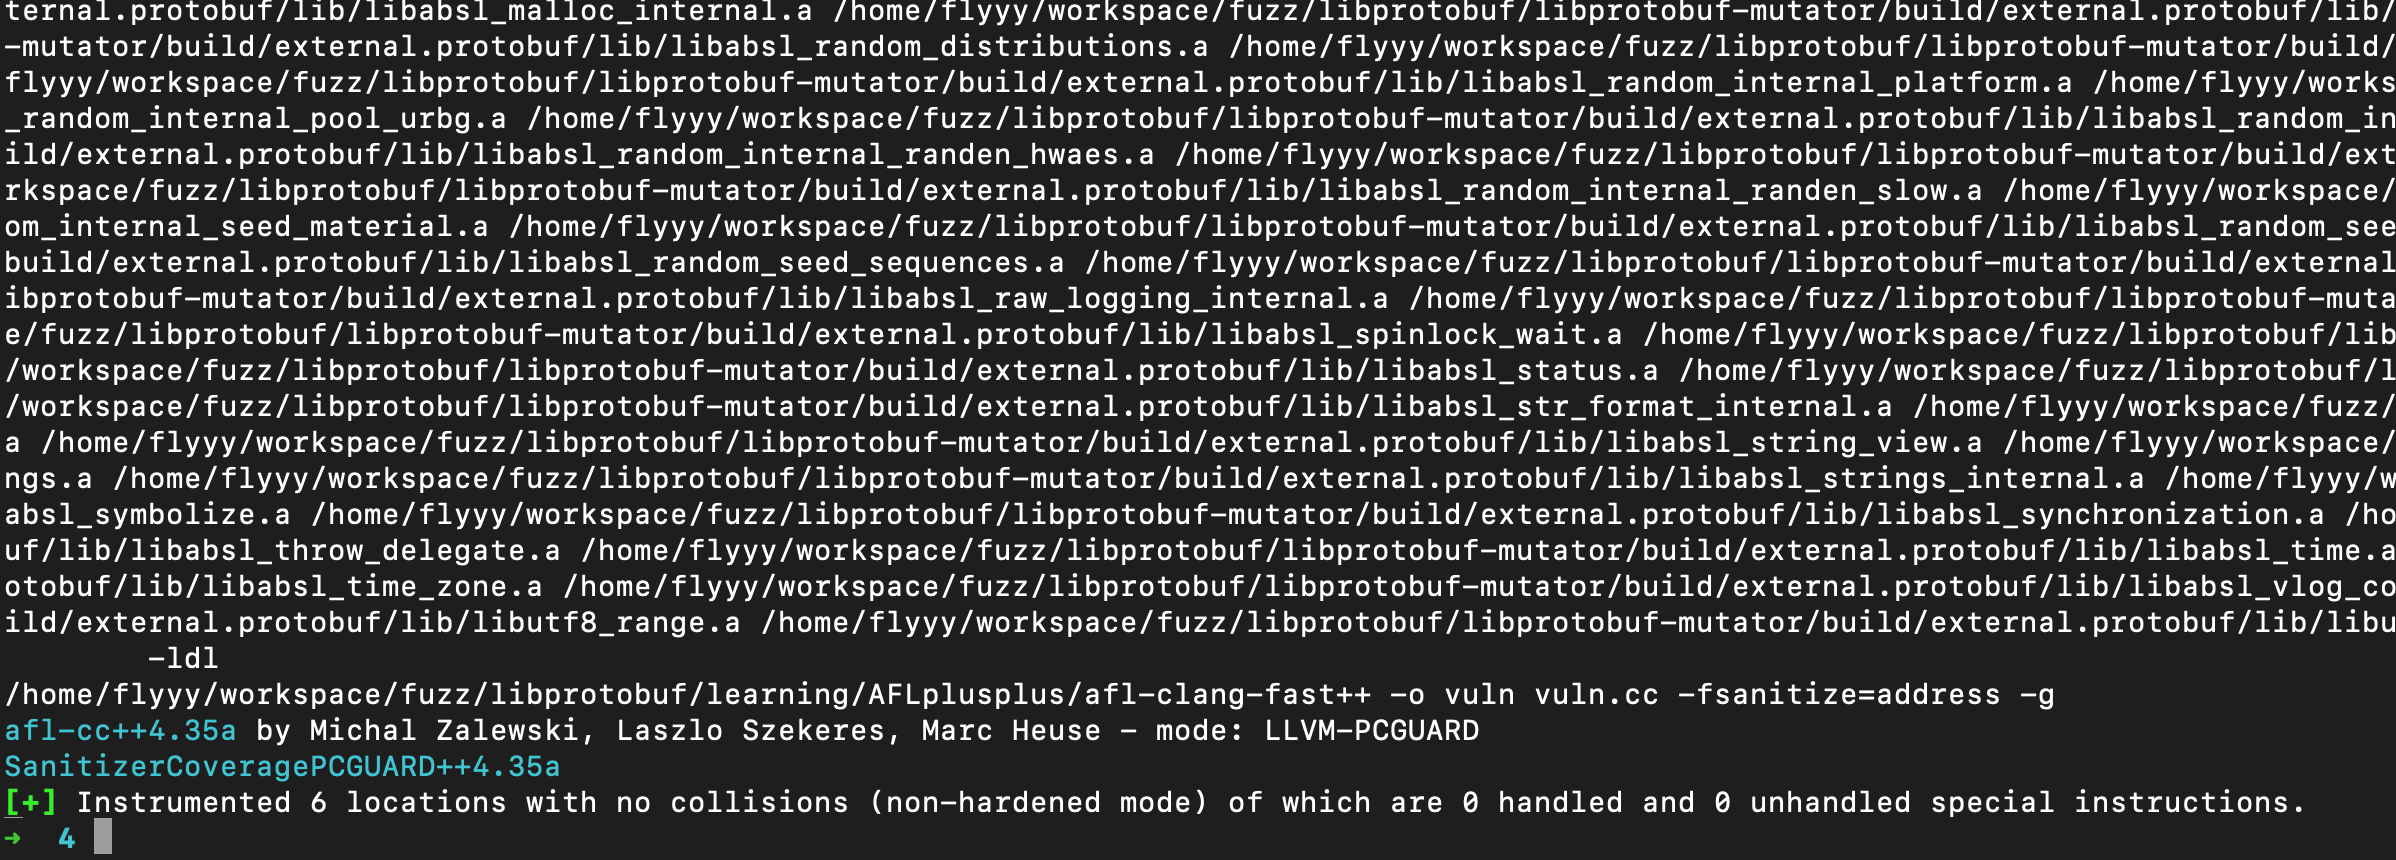
这里有一个坑点,由于我之前没有编译成so的需求,所以之前编译LPM的时候编译选项里没有-fPIC ,所以这里需要用如下指令重新编译一下
1 2 cmake .. -GNinja -DCMAKE_C_COMPILER=clang-14 -DCMAKE_CXX_COMPILER=clang++-14 -DCMAKE_POSITION_INDEPENDENT_CODE=ON -DCMAKE_BUILD_TYPE=Debug
同时这里也将官方doc上的编译选项加上去-shared -Wall -O3 ,执行make之后如下
下面就是开始调用AFL++进行fuzz
先随便给个样本
1 2 3 4 ➜ 4 cat ./input_dir/seed1 a: 7 b: "aaaa" ➜ 4
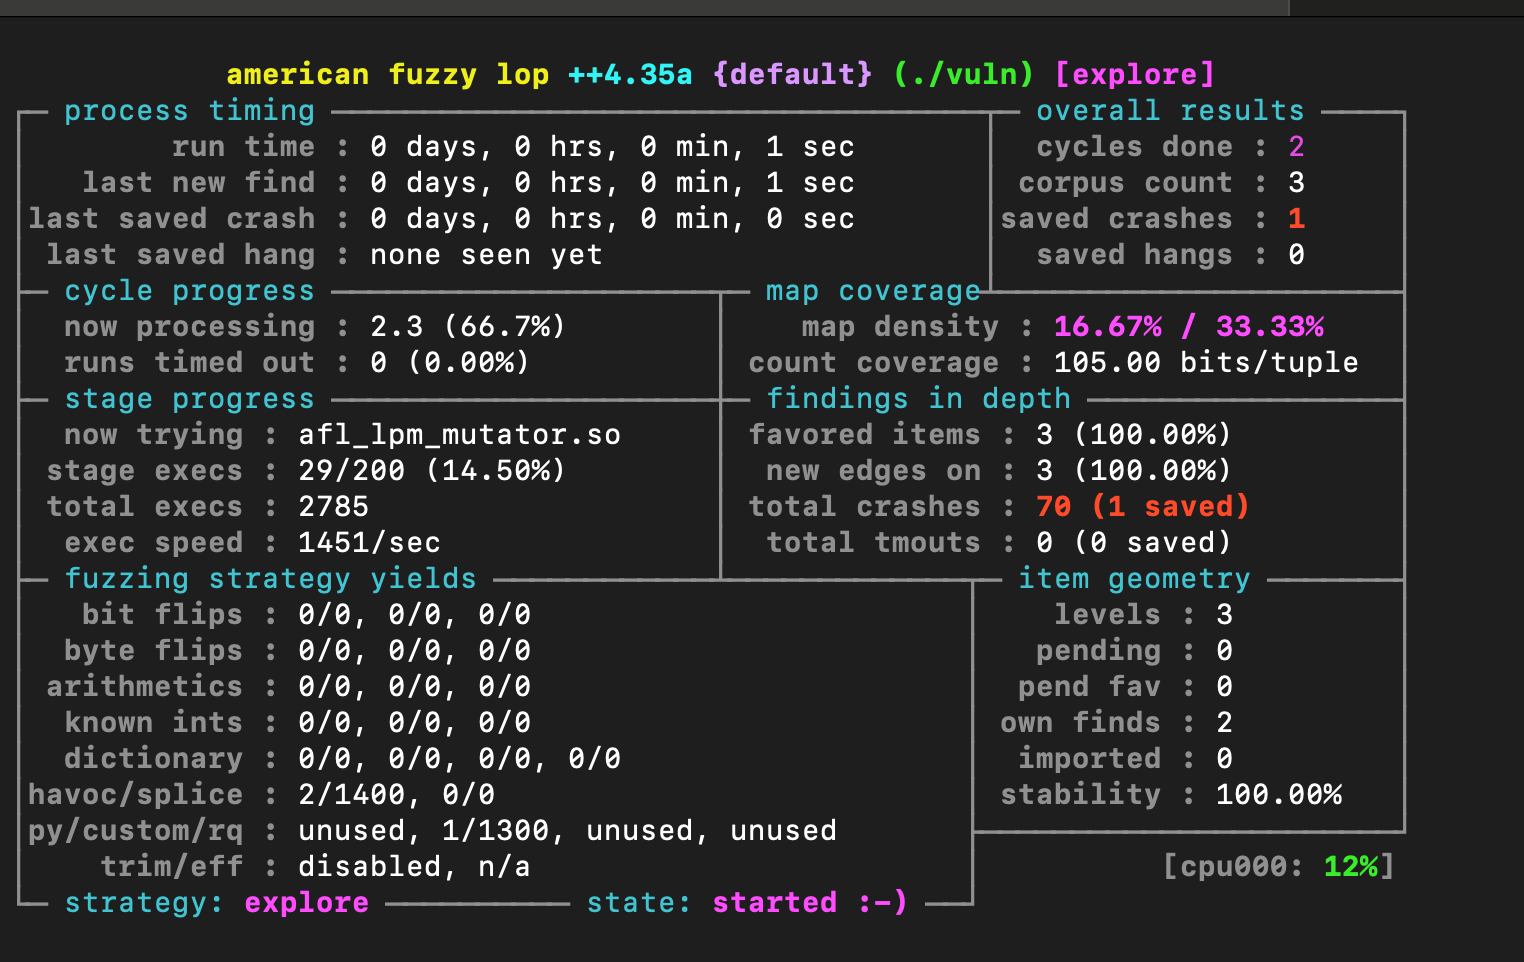
执行make fuzz之后,基本上秒出crash
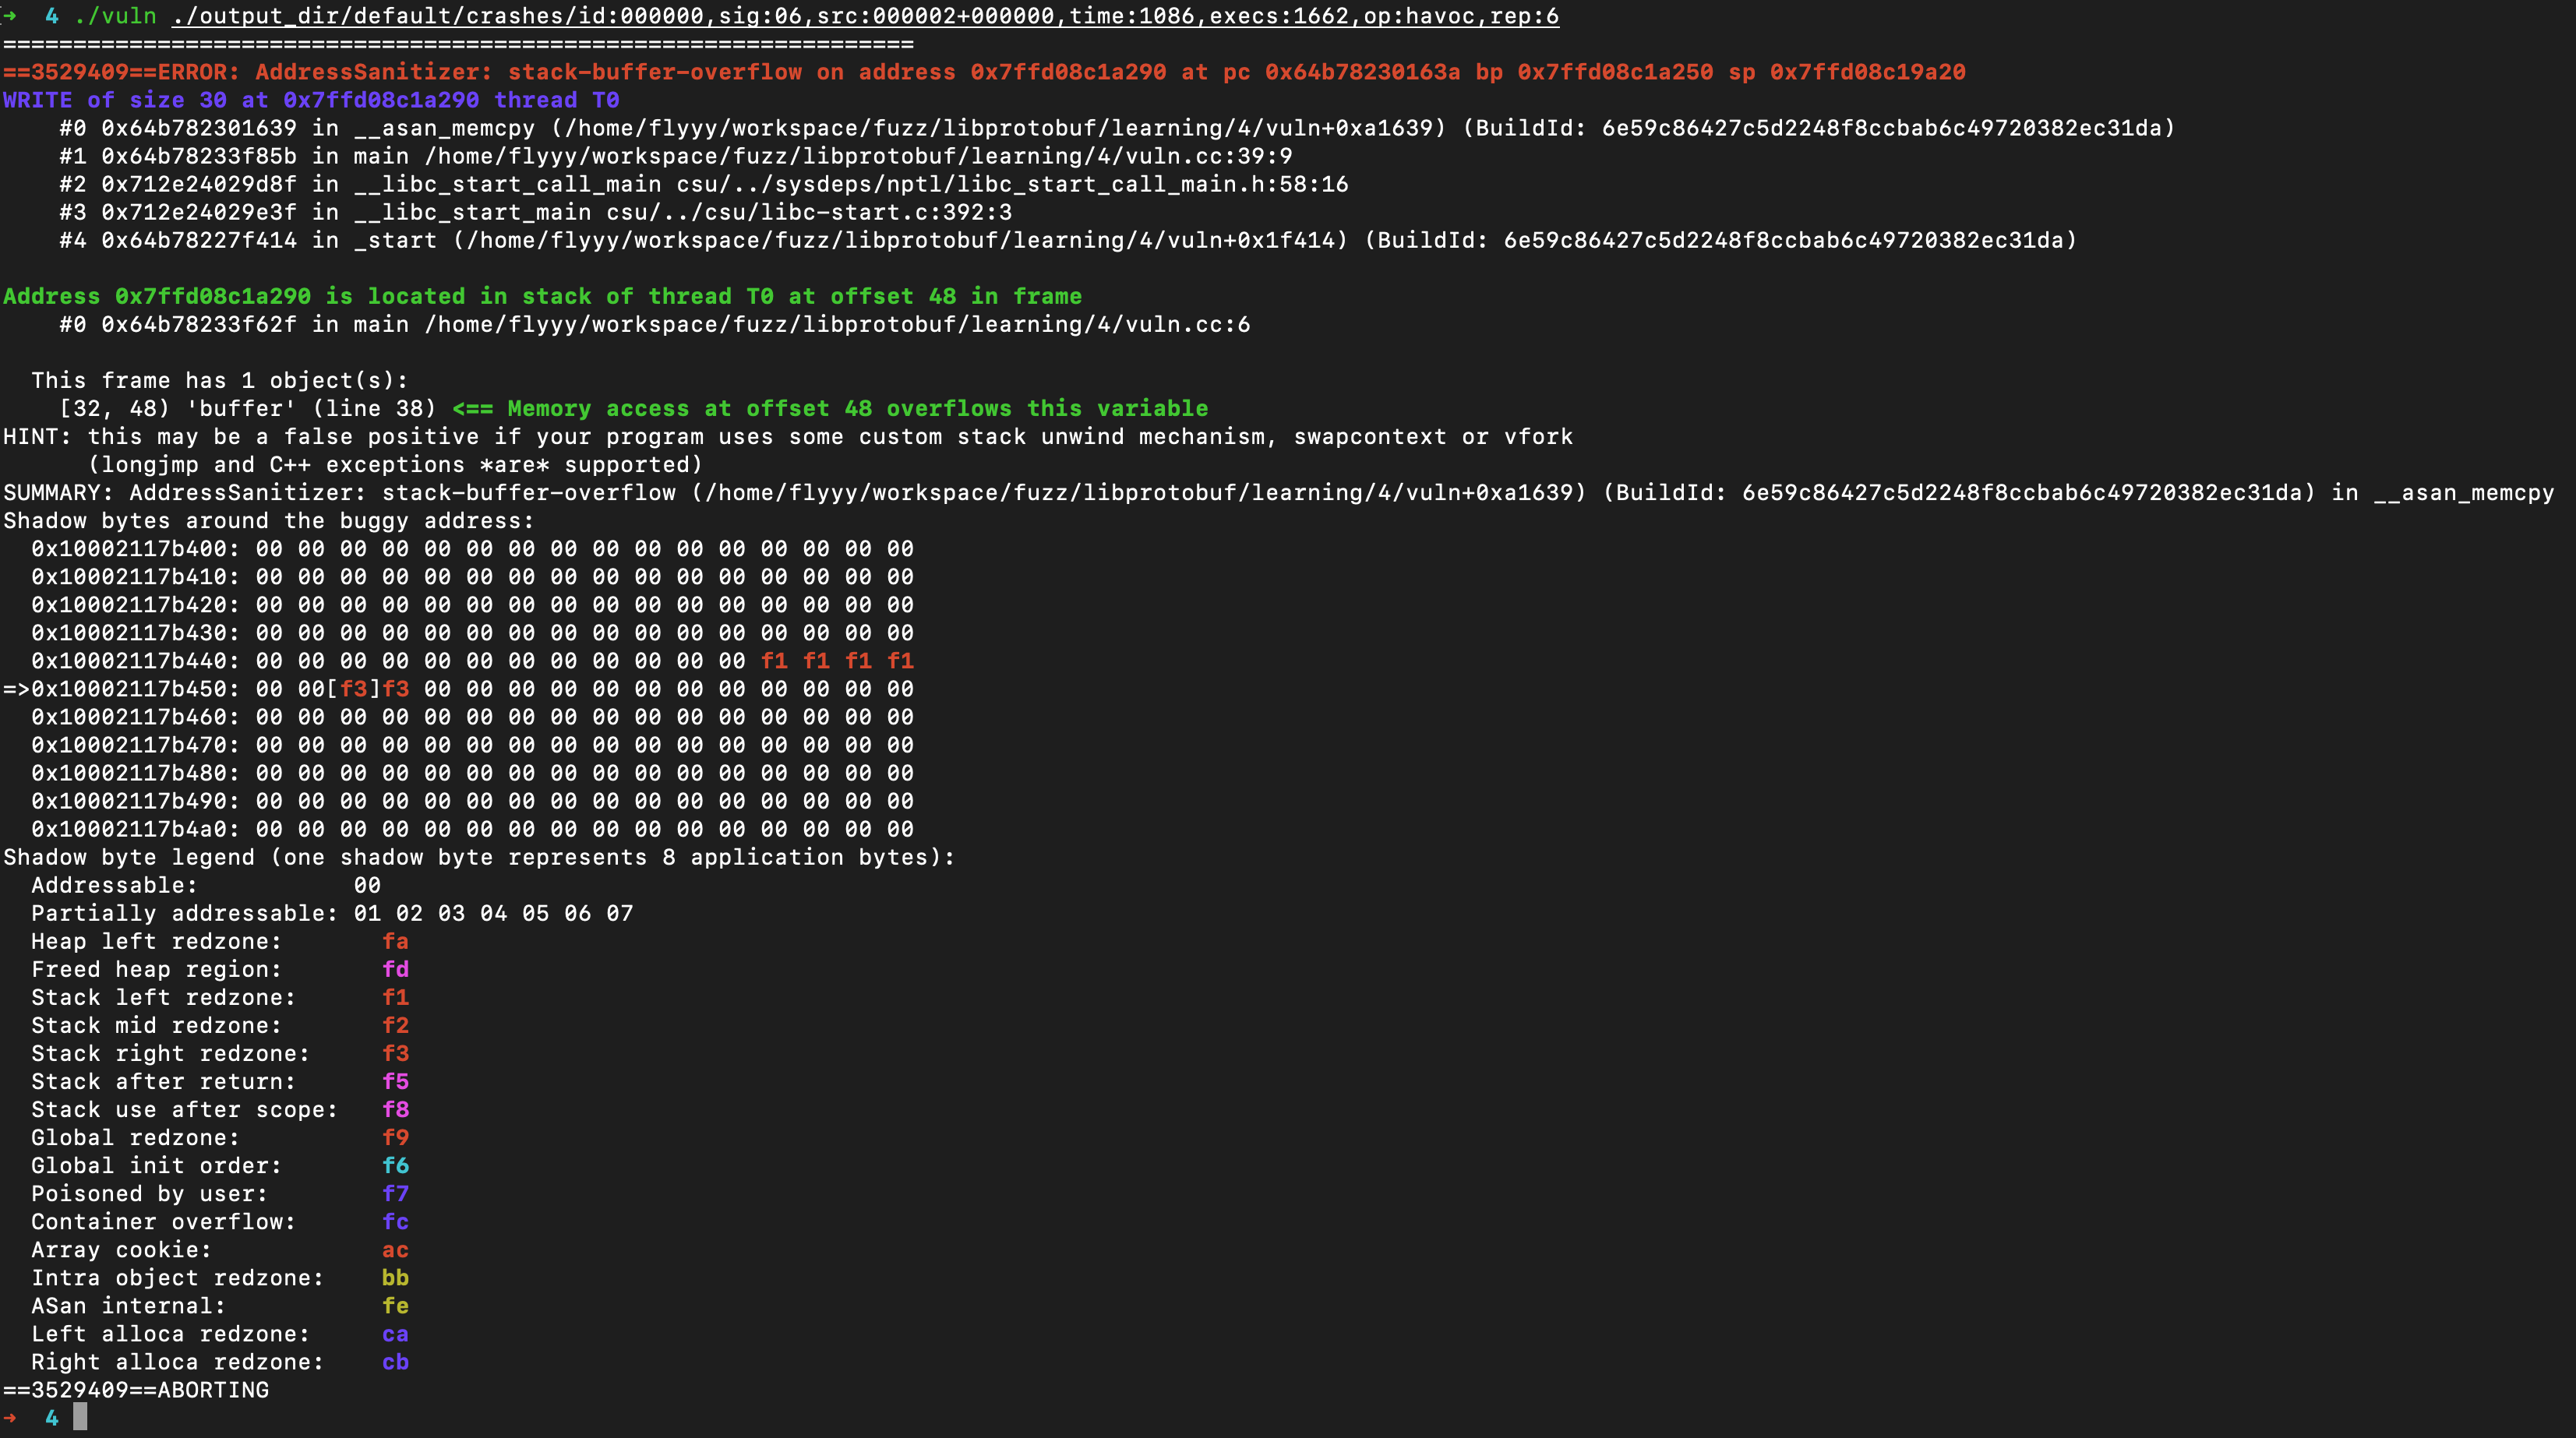
将crash样本喂给vuln函数,就可以得到asan的分析结果
发生了stack-buffer-overflow
调用栈在T0线程,也就是主线程。接着关注源码的crash位置就可以了,#1 0x64b78233f85b in main /home/flyyy/workspace/fuzz/libprotobuf/learning/4/vuln.cc:39:9
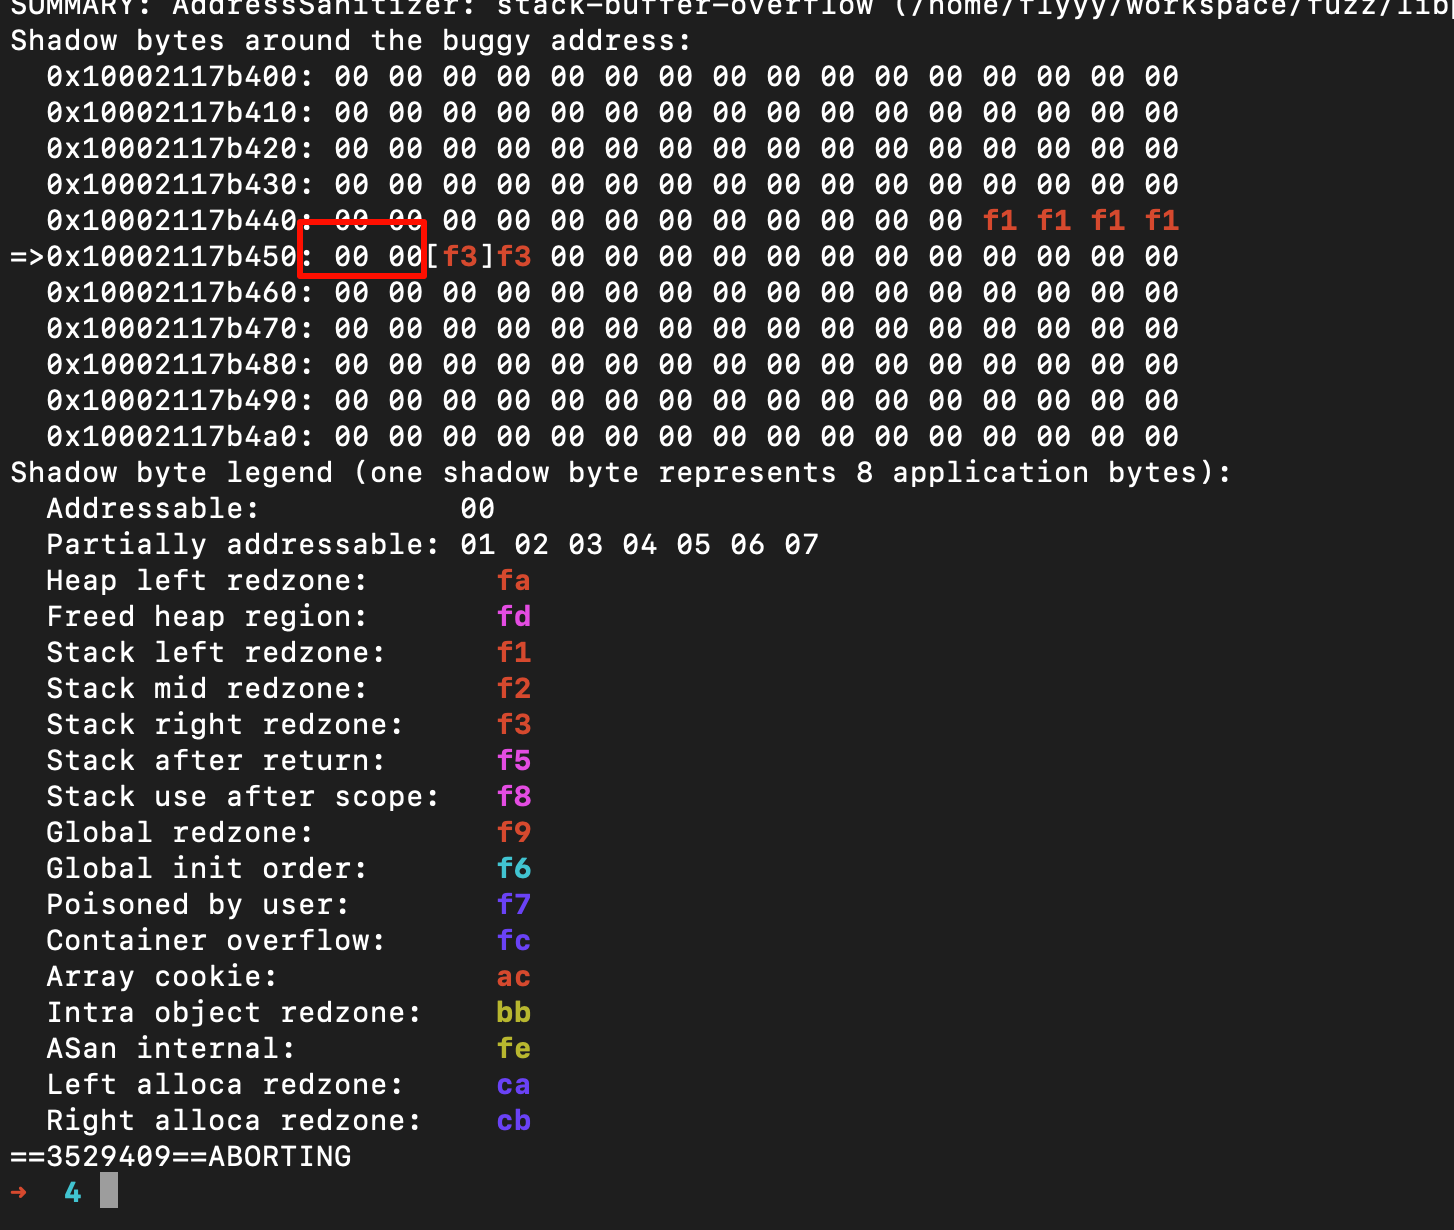
分析栈上数据[32, 48) ‘buffer’ (line 38),这里的意思就是说这个对象大小应该是48-32=16
下方红框处就是这个对象的位置,但是已经越界到了右侧,说明发生了栈溢出